How to Brief a Factory on Custom Saddle Pads: Tech Packs, Artwork and Samples
Published · Cornovo Saddlery
Consider a common scenario: a buyer sends a factory a few inspiration photos and a note reading like this but in navy with our logo. The first sample arrives in the wrong shape, with the logo stitched at the wrong size, in a navy that matches nothing in the catalog. Round two fixes the shape but the embroidery is blurry. By the third round, the launch season is gone — and so is the factory’s goodwill.
The fix is unglamorous: a written brief, complete before the first quote, that removes every judgment call from the factory floor. For a wholesale buyer or private-label brand, that brief is the tech pack — flat sketches, materials, measurements, color standards, artwork, and packing on one dated, versioned document. This guide covers what goes in it, how to supply embroidery and Pantone references properly, how to run sample rounds without burning the timeline, and how brief depth should change by customer type.
This post is an operator’s manual for importers, distributors, and private-label brands developing custom saddle pads — what to prepare before the first quote so the factory builds your pad, not its interpretation of your pad.
Key takeaways
- A custom saddle pad tech pack needs flat sketches, construction notes, materials, thread colors, labels, sizing, and packing — on one organized, versioned document, not scattered emails.
- Embroidery artwork must arrive as vector files with stitch counts, sizes, and placement measurements — a JPG logo is not production artwork.
- Pantone references (physical chips, not screen colors) prevent the most common dispute in custom programs: color mismatch.
- Plan for two sample rounds: a proto sample for construction and a pre-production sample for final approval — treat one round as a bonus, not the plan.
- Every change after pre-production approval is a new charge and a new timeline — lock approvals in writing with dated photos.
- Brief depth should match the program: a private-label brand needs a full tech pack; a distributor reordering a proven shape may need far less — confirm scope per order.
Why do most custom saddle pad projects miss the first sample?
Because the factory built what the buyer described — and pictured something different. The gap sits in one of five places: the shape profile, the fabric and fill, the embroidery size and position, the color standard, or details like binding and labels. Each is a judgment call the factory makes cheaply unless the brief rules it out.
What is a tech pack?
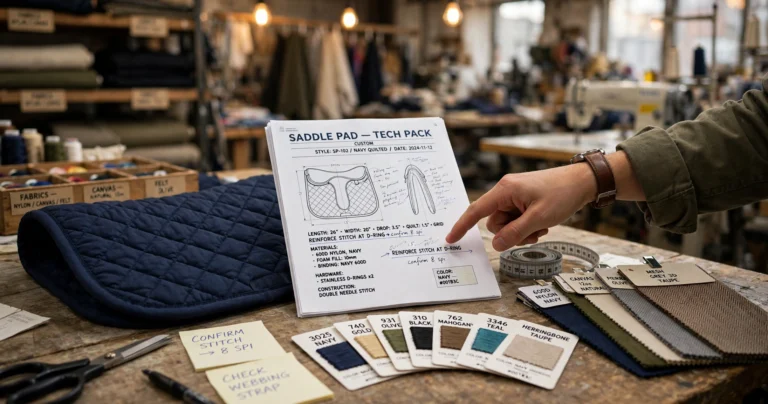
A tech pack is the design-to-production document for a custom product: flat sketches, construction and material notes, measurements, colors, trims, labels, and packing instructions, organized so a factory can quote and build from it without questions. In saddle pad programs it typically runs a few pages and carries a version number and date — bump the version on every change.
What goes into a custom saddle pad tech pack?
Build your tech pack in this order. Each block answers one question the factory would otherwise guess at:
- Cover block: style name and number, season or PO reference, date, and version number (v1.0, v1.1). Every later change bumps the version.
- Flat sketches: front and back views of the pad drawn flat — not lifestyle photos. Mark the outline shape (square, dressage, AP contour), quilt pattern, binding, and strap or billet positions.
- Construction notes: shell fabric and fill per layer (e.g., quilted cotton-poly shell, polyester fill with confirmed GSM, brushed cotton lining), called out on the sketch with leader lines.
- Measurements: a table of finished dimensions per size — spine length, drop length, front edge width — measured flat. State where each measurement is taken.
- Colorways: each colorway listed with Pantone references for shell, binding, thread, and trim. Photograph physical Pantone chips; screen colors shift between monitors.
- Embroidery / print: logo placement measurements from fixed edges (e.g., logo center 12 cm below top edge, 8 cm left of spine seam), stitch size, thread colors by a thread standard the factory stocks or Pantone thread reference.
- Labels and packaging: main label, size label, care label content and positions; individual packing method and carton specs.
- Reference photos: numbered photos of the closest existing product or sample, with notes saying exactly what to copy and what to change.
Put this in a PDF or a shared document the supplier can download — not pasted into an email thread where half of it gets missed (see how OEM saddle pad programs work for the full development flow this brief kicks off).
How should you supply embroidery artwork and thread colors?
Embroidery is where custom programs go wrong most visibly, because buyers supply marketing artwork and factories need stitching artwork. Marketing artwork is a logo designed to look good on screen. Stitching artwork is that logo translated into thread — and the translation is a skilled, paid step called digitizing.
Send vector files (AI, EPS, or SVG) with the logo in solid shapes — no gradients, and no fine details below a couple of millimeters, as a typical guideline; confirm the factory’s minimum detail size per order. State the finished stitch size in millimeters or centimeters, because the same file stitched at 8 cm and 12 cm produces visibly different quality. If the factory digitizes the file, ask to see a stitch-out photo or the digitized preview before it goes on the sample pad; blurry or gappy stitching at this stage will not fix itself in production.
For thread colors, name a thread standard the factory actually stocks — Madeira and Coats are the common references in textile factories — or supply Pantone thread colors. Gold is not a color standard; Madeira 1070 is. Small text and fine lines below a few millimeters tall will lose legibility in thread, so simplify the artwork or switch to a woven label for detail-heavy logos (see saddle pad custom branding for logo-method tradeoffs).
How do you write size specs factories can actually follow?
Write every measurement as: number, unit, tolerance, and measuring point. Spine 58 cm ± 1 cm, measured flat along the top edge is a spec. About 58 is merely a suggestion. Factories cut to the document, not to the photo.
Include a graded size table if the program covers multiple sizes — pony, cob, full, oversize — with each dimension scaled per size rather than left to the factory’s habit. State which size is the base pattern the others grade from. And add one line buyers forget: how the pad is measured for QC — flat and relaxed, or hung — because a contoured pad measures differently under tension, and that difference becomes a dispute at inspection.
How many sample rounds should you plan for?
Two. Plan the timeline and the budget for two sample rounds, and treat a one-round outcome as a bonus, not the plan. A proto sample takes a few weeks after the tech pack is confirmed, and a pre-production sample a similar span after proto approval. Confirm the sampling calendar in writing — timing varies by factory and season.
Round 1 — proto sample. Built to check construction: shape, quilting, binding, strap placement, embroidery size and position. It may arrive in a substitute fabric or color. Review it against the tech pack line by line, mark up photos, and return consolidated feedback in one message — never a drip of daily comments.
Round 2 — pre-production (PP) sample. Built in final materials, colors, labels, and packaging. This is the approval gate: once you approve the PP sample in writing, with dated photos, it becomes the production reference. Most factories photograph and seal one PP sample per style on their side too.
What derails timelines is not two rounds but six, and six rounds happen when feedback arrives piecemeal or the brief changes mid-stream. Consolidate comments, get sign-off internally before sending, and freeze the tech pack at PP approval. Any change after that is a new charge and a new timeline — say so in the brief so nobody is surprised.
What causes revision loops, and how do you prevent them?
Every row in this table is a mistake we see buyers make once — the good buyers make it exactly once. The pattern is always the same: a decision left to the factory becomes a revision round:
| Loop cause | What it costs | Prevention |
|---|---|---|
| Logo supplied as JPG/PNG only | Blurry embroidery, at least one lost round | Send vector files; approve the digitized stitch-out before sampling |
| Colors matched from screen photos | Wrong-dye production, possible remake | Pantone chips + lab-dip approval before bulk dyeing |
| Standard size with no table | Pads that don’t fit the target horse sizes | Finished measurement table with tolerances and measuring points |
| Feedback sent piecemeal | Conflicting instructions, extra rounds | One consolidated feedback message per round, internally approved first |
| Packing assumed, not specified | Repacking charges or damaged goods | Polybag, header card, and carton specs in the tech pack |
Two cost items buyers should expect in the quote: the sample charge (commonly waived or credited against the bulk order at many factories, but not all) and the embroidery digitizing fee, which is typically a one-time per-design cost. Ask about both before approving the first sample so they appear on the proforma, not as surprises.
How should brief depth change by customer type?
Not every program needs a full eight-block tech pack. The brief should match what is actually changing — over-briefing a simple reorder wastes both sides’ time, and under-briefing a new design wastes more. As a starting hypothesis — adjust per program:
- Private-label brand launching a new line: full tech pack with flat sketches, graded sizes, Pantone chips, vector artwork, and packaging. Two sample rounds as standard; plan the sampling calendar around your launch date.
- Distributor developing a house brand from an existing shape: reference sample plus a short change-list tech pack (colorways, logo placement, labels, packing). One full round plus a PP check is often enough when the construction is proven.
- Distributor reordering a proven style in new colors: new colorways with Pantone chips and a lab-dip approval may be the whole brief. Skip the proto round only if construction and sizing are unchanged from the sealed sample — and say so in writing.
Whatever the depth, keep the same discipline: one dated document, one version number, approvals in writing with dated photos. A two-line color-change email with no version number is how the same as last time but in green turns into a remake.
What specs should I confirm when requesting a quote?
When you send a custom saddle pad brief to a factory, confirm the tech pack format they prefer (PDF or shared document), the sample round count and sampling calendar in writing, who digitizes the embroidery and who owns the digitized file, the color standard process (Pantone chips plus lab-dip approval), the graded size table with tolerances and measuring points, the packing spec per carton, and the charge structure — sample fees, digitizing fees, and how each is credited or billed. Standard MOQ is 50 pieces per color; pricing and delivery terms are confirmed per quote.
Frequently asked questions
What file format should I send for embroidery on saddle pads?
Send vector artwork — AI, EPS, or SVG — with solid shapes and no gradients. Raster files like JPG or PNG force the factory to redraw the logo before digitizing, which adds a round of revisions and quality risk. Always state the finished stitch size, since scaling the same file changes stitch density and legibility.
Do I need physical Pantone chips, or are digital codes enough?
Digital codes are a start, but factory dyeing is matched against physical references. Mail or courier a physical Pantone chip for each critical color and approve a lab dip — a dyed fabric swatch — before bulk production. Color disputes are the most common and most expensive disagreement in custom programs, and a chip costs almost nothing.
How long does a custom saddle pad sample take?
Allow several weeks per round rather than counting days: a proto sample takes a few weeks after the tech pack is confirmed, and a pre-production sample a similar span after proto approval, with embroidery digitizing and lab-dip approvals able to extend either. Build a realistic sampling buffer into your launch plan before production lead time starts — and confirm the factory’s current sampling calendar in writing, since it varies by season and workload.
What is the typical MOQ for a custom saddle pad program?
Our standard MOQ is 50 pieces per color, which lets you run two to four colorways in a single order without overstocking any one of them. Keep in mind that each colorway and each embroidery design counts as a separate setup, so consolidating colors and logos keeps unit costs down and sampling faster.
Who owns the embroidery digitizing file?
Clarify this in writing before sampling starts. Some factories treat digitizing as a service included in the order and keep the file; others charge a fee and release it. If you plan to move the program between suppliers later, negotiate file ownership or at least a copy up front — redigitizing the same logo elsewhere costs time and risks a visible mismatch.
Sources & Further Reading
- How OEM saddle pad programs work (internal): the full custom-program flow — embroidery, colors, and private label — that a tech pack brief sets in motion.
- Saddle pad custom branding (internal): embroidery, piping, and logo options for private-label buyers, including logo-method tradeoffs.
- Custom saddle pad MOQ and lead times (internal): what is typical on MOQ and lead times, and how sampling fits the calendar.
- Pre-shipment saddle pad quality control checklist (internal): inspecting the bulk run against the approved pre-production sample.
- Launching a private-label saddle pad line (internal): the 90-day timeline a good brief keeps on track.
Starting a custom saddle pad program? Send your tech pack — or a rough sketch and your target colors — and we will quote with sampling rounds, digitizing, and lead times spelled out. Standard MOQ is 50 pieces per color.
Related: how OEM saddle pad programs work, saddle pad inventory planning for tack shops.
